Installing root certificate in android and mitmproxy

Well, since you are here, you are probably planning to spy on traffic generated by the apps on your phone, probably looking to find out what apps are leaking your private information !

How this all works: When an application on your phone contacts a website/web-server over a secure connection, your phone checks the certificate, and checks whether or not that certificate was issued by an authority the phone trusts, what we are doing is telling the phone to add YOU to the list of trusted authorities, then, we create a proxy that the phone connects through (mitmproxy). Now, the proxy contacts the website on behalf of the application that sent the request, gets the response / contents of that page, saves a copy of that response, and repackages it using our own security certificate, then sends it to the phone, at this stage, the phone thinks the certificate belongs to the website it was contacting (Because now it trusts you), and everything works as it normally would. This does not work if the app has a pinned certificate, a pinned certificate is when an app does not trust the list of authorities the system maintains and requires a certain certificate, but this too has a workaround !

here is what you need to do.

I am assuming you already have a rooted virtual android device (AVD), if not, here are the instructions, in my case, even though it is mid 2026, i decided to go with a Google Pixel 6 with android 12 (The pixel six has updates up to the most current Android 17, but i decided to go with Android 12)

You need to create a root certificate, and install it in both mitmproxy and android, the mitmproxy gets the pem file with the certificate and private key (So that it can create certificates for websites on the fly), while android gets the one with the certificate (Obviously)

1- Gnerate the private key

openssl genrsa -out android-mitm-ca.key 4096

2 – Create the CA certificate


openssl req -x509 -new -sha256 -key android-mitm-ca.key -out android-mitm-ca.crt -days 3650 -subj "/C=JO/O=Android Traffic Analysis/CN=Android MITM Analysis CA" -addext "basicConstraints=critical,CA:TRUE" -addext "keyUsage=critical,keyCertSign,cRLSign"

3- Installing mitmproxy (On your debian machine)

install Prerequisites:

sudo apt install python3-dev libffi-dev libssl-dev libxml2-dev libxslt1-dev libjpeg-dev zlib1g-dev

Debian 13 does not have it in repositories (12, and 14 do !), so we need to install from binaries downloaded from the website ! so i put them in /opt/mitmproxy and symlinked the files in /usr/local/bin

4- Concatinate/combine key and cert into 1 file for the mitmproxy

cat android-mitm-ca.key android-mitm-ca.crt > ~/.mitmproxy/mitmproxy-ca-my.pem
chmod 600 ~/.mitmproxy/mitmproxy-ca-my.pem

5- running and check that mitmproxy is using our cert

First, run mitmproxy.

NO-GO: mitmproxy –listen-host 192.168.7.119 –listen-port 8080 –certs “*=$HOME/.mitmproxy/mitmproxy-ca-my.pem” (No go because certs is for individual domains)

NO-GO:

mitmproxy --certs "*=$HOME/.mitmproxy/mitmproxy-ca-my.pem"

Or if needed

mitmproxy --listen-host 192.168.7.119 --listen-port 8080 --set confdir="$HOME/.mitmproxy-my"

Or if you want access from outside your network

mitmproxy --listen-host 192.168.7.129 --listen-port 8080 --set block_global=false --set confdir="$HOME/.mitmproxy-my"

From another terminal, let us try to get the contents of example.com through the proxy:

openssl s_client -proxy 192.168.7.119:8080 -connect example.com:443 -servername example.com </dev/null 2>/dev/null | openssl x509 -noout -issuer -subject

Now, if the proxy works as intended, and is correctly signing our requests with our own certificate, we should see something like isuer: Android MITM Analysis CA (The name we chose)

So, now our proxy is ready and serving, all that remains is relevant to Android, we have already made the android certificate to add (OUR_HASH.0)

Installing the certificate on the android phone

The only thing that is confusing about this section is that not all android phones work in the same way ! I am deliberately using Android 12 (Will install most software while being somewhat easier to tinker with), you on the other hand may be using android 16 or 17 (The latest at the time of writing).

Also, I am using a virtual android phone (With Android Studio), you may be using an actual rooter physical phone !

So, I will outline when something is going to be different on other android versions, and you will have to figure it out (Use Google, or gemini or something)

6- Certificate File Name for android

figure out the hash for the filename of the Android file (The file name should be “hash.0”, replace hash with the actual hash resulting from the below) this is how android expects the file name to be

HASH=$(openssl x509 -inform PEM -subject_hash_old -in android-mitm-ca.crt | head -1)
echo "$HASH"

Now, copy the file android-mitm-ca.crt and name the copy the same as the resulting hash with an added .0 at the end (THEHASH.0)

7- If android 16+ (I am using 12, but if you have 16+)

If your rootAVD image is Android 16 or above, don’t blindly follow the old /system/etc/security/cacerts/ procedure. Android 16 changed the system certificate location, and current mitmproxy documentation has a separate procedure involving a Magisk certificate-moving module.

check your android version

adb shell getprop ro.build.version.release
adb shell getprop ro.build.version.sdk
adb shell getprop ro.product.cpu.abi
adb shell su -c 'id'
$ adb shell getprop ro.build.version.release
12
$ adb shell getprop ro.build.version.sdk
31
$ adb shell getprop ro.product.cpu.abi
x86_64
$ adb shell su -c ‘id’
uid=0(root) gid=0(root) groups=0(root) context=u:r:magisk:s0

So, in my case, I am running android 12 ! Software development kit 31 (API level), X86 cpu, and (context=u:r:magisk:s0)

8- Explore the filesystem

Let us check and explore the files and folders on filesystem


> adb shell su -c 'ls -ld /system/etc/security/cacerts'
drwxr-xr-x 2 root root 4096 2023-07-26 23:02 /system/etc/security/cacerts

> adb shell su -c 'mount | grep -E " /system | / "'
/dev/block/dm-4 on / type ext4 (ro,seclabel,relatime)

> adb shell su -c 'ls -l /system/etc/security/cacerts | head'
total 952
-rw-r--r-- 1 root root 2871 2023-07-26 23:02 01419da9.0
-rw-r--r-- 1 root root 2914 2023-07-26 23:02 04f60c28.0
-rw-r--r-- 1 root root 2345 2023-07-26 23:02 0d69c7e1.0
-rw-r--r-- 1 root root 4622 2023-07-26 23:02 10531352.0
-rw-r--r-- 1 root root 4724 2023-07-26 23:02 111e6273.0
-rw-r--r-- 1 root root 4308 2023-07-26 23:02 12d55845.0
-rw-r--r-- 1 root root 2599 2023-07-26 23:02 1ae85e5e.0
-rw-r--r-- 1 root root 4931 2023-07-26 23:02 1df5a75f.0
-rw-r--r-- 1 root root 4535 2023-07-26 23:02 1e1eab7c.0

So, we do have the path /system/etc/security/cacerts on the phone, system (See second command above) is mounted read only, there are 952 certificate files in the /system/etc/security/cacerts folder.

Reminder: On Android 12, the traditional system CA location we’re interested in is: /system/etc/security/cacerts/ , The certificates are stored there using the OpenSSL subject-hash filename convention, e.g.: xxxxxxxx.0

The plan at this stage is to use magisk to add our certificate as an overlay, this way, we don’t need to modify the actual system, meaning, we will not be mounting system in read-write mode, read-only is fine by us

9- Explore Magisk

So let us start by checking what version of MAGISK is installed on the phone, and where it lives

> adb shell su -c 'magisk -v'
26.4:MAGISK:R
> adb shell su -c 'magisk --path'
/debug_ramdisk
> adb shell su -c 'ls -la /data/adb/modules'
total 24
drwxr-xr-x 3 root root 4096 2026-08-26 12:05 .
drwx------ 6 root root 4096 2026-08-26 12:11 ..
drwxr-xr-x 3 root root 4096 2026-08-26 12:07 hosts

Since this is rootAVD/Magisk, the clean approach is to use a Magisk overlay so we don’t modify the underlying system image.

10- Create the Magisk module with the certificate in it !

we can create our own small Magisk module specifically for the CA without touching the original system image. (the only existing module is hosts)

To create a magisk module we need to do the following

10.1- Create an identical folder structure on my debian machine *(Yours can be windows)

mkdir -p ~/.mitmproxy/module/system/etc/security/cacerts

Move your certificate (xxxxx.0) to the cacerts folder we created above

Now create the module file (Module dfinition file), obviously you can create it with a text editor as well if you wish.

cat > ~/.mitmproxy/module/module.prop <<'EOF'
id=android-mitm-ca
name=Android MITM Analysis CA
version=1.0
versionCode=1
author=Voodoo
description=Custom CA certificate for controlled Android traffic analysis
EOF

Now, put the contents of the module directory (Without the module directory itself) in a zip file

cd ~/.mitmproxy/module
zip -r ../android-mitm-ca.zip .

Now, open the zip file in fileroller (or 7-zip or winrar, whatever suits you) and make sure we have

module.prop
system/
system/etc/
system/etc/security/
system/etc/security/cacerts/
system/etc/security/cacerts/XXXXXXXX.0

If all looks good, super, we have the zip file for android…. go ahead and push it to the android virtual machine

> adb push ~/.mitmproxy/android-mitm-ca.zip /data/local/tmp/

Now, when the above works, install the zip file with magisk

> adb shell su -c 'magisk --install-module /data/local/tmp/android-mitm-ca.zip'
- Device is system-as-root
**************************
Android MITM Analysis CA
by Voodoo
**************************
*******************
Powered by Magisk
*******************
- Extracting module files
- Done

If you get an error above DO NOT REBOOT, only reboot if you get a message like the one i got. if not, Sorry man, you need to reverse the steps above ! something with the rootAVD restore command should do

Now, after rebooting (adb shell reboot), run this to see if our certificate appears !

adb shell su -c 'ls -l /system/etc/security/cacerts/'

Looks fine to me, but let us double check (replace the xxx with your actual file name)

adb shell su -c “ls -l /system/etc/security/cacerts/xxxxxx.0”
-rw-r–r– 1 root root 2000 2026-08-27 20:28 /system/etc/security/cacerts/xxxx.0

And if everything was done correctly, “adb shell su -c ‘mount | grep ” / “‘” should still show read-only

Now, let us play, I am very skeptical that this would work (Unless your android has openssl), but it can’t hurt to try… anyway, failiure here means nothing is the error is that “openssl: inaccessible or not found”, it is expected, and means nothing

adb shell su -c "openssl x509 -in /system/etc/security/cacerts/fea8a918.0 -noout -subject -issuer"

Pinned certificates

there are ways to get around this, ways from things as simple as using apk-mitm to remove the pinning, all the way to more serious stuff such as using jadx to modify the software before playing this game.

Here are some tools that can come in handy for this

  • FRIDA: Lets you inject snippets of JavaScript or your own library into native apps + simple tools built on top of the Frida API.
  • APK-MITM: (https://github.com/shroudedcode/apk-mitm): Remove certificate pinning from APK files
  • objection is a runtime mobile exploration toolkit powered by Frida, which supports certificate pinning bypasses on iOS and Android.
  • ssl-kill-switch2 blackbox tool to disable certificate pinning within iOS and macOS applications.
  • android-unpinner : From the same people who make the MITMPROXY, it modifies Android APKs to inject Frida and HTTP Toolkit’s unpinning scripts.

apk-mitm

node --version
npm --version
sudo apt install zip unzip
npm install -g apk-mitm

Now, to remove the pinning in your app

apk-mitm <path-to-apk>
SSH tunnel for VNC

If you were on a linux machine, it would be as simple as

ssh -L 5901:localhost:5901 root@192.168.7.119

Just kidding, don’t login as root, it is all just for tunneling, replace root and the IP of my super top secret server with something suitable

On windows, the most popular SSH client is putty, and to do that in putty, follow the following steps

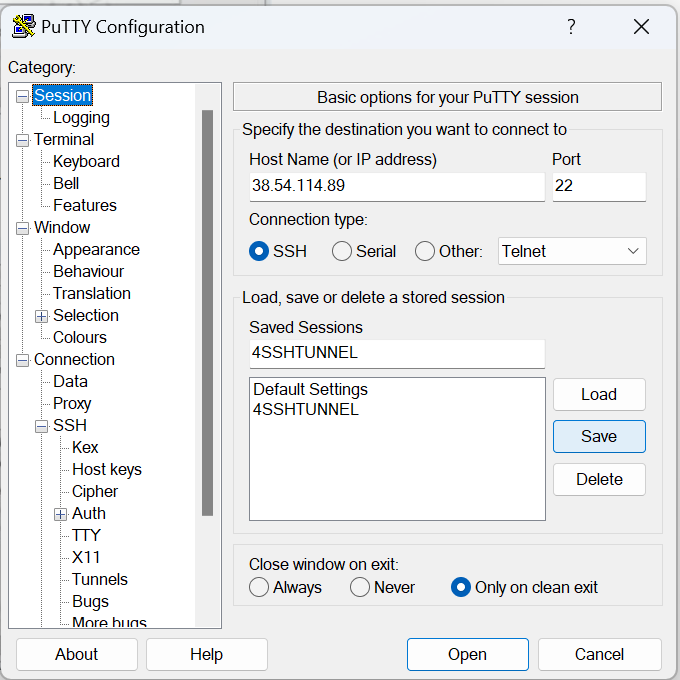
Open putty, then enter the IP address or hostname of the remote machine

stackoverflow not opening in firefox

For some reason still unknown to me, stack overflow was not opening on my machine !

Not sure if the issue is cloudflare which seems to relevant to stackoverflow

It started opening when i went into settings (about:config), then disabled network.http.http3.enable then opened the website, then re-enabled it, still waiting for it to stop working again for further investigation, but for now, it is working just fine

Sunshine and moonlight

VNC and RDP are great and all, and for so many purposes, they are the goto solution for remoting into a machine.

Now, another solution which is great (And much better if you have the bandwidth) is to broadcast your screen video and do all the work on the server rather than the client

The solution used to be nvidia’s game stream, which was abandoned by nvidia, the new solution based on nvidia would be the sunshine (Server) and moonlight client

The sunshine+moonlight duo work on almost every platform I need, Windows, Mac, Android, iOS, Even LG TVs running web OS… in short, it is a more universal solution. You can even create a virtual non existent monitor under linux and stream that to a different device !

So, let us start with the server (Sunshine)

Sunshine on debian

Installing sunshine on debian is very easy as a .deb installation file is provided, sunshine is not yet in the debian repositories, but if i understand the license correctly, it can be some time in the future

Now, go to the sunshine website, and download the deb file., in my case, I visit this webpage, and download the sunshine-debian-bookworm-amd64.deb file

Now, from the command prompt, su (to run as root), then cd to the directory where your deb file resides, then “sudo apt install ./sunshine-debian-bookworm-amd64.deb”, We should now have the server running and waiting to be opened in the web browser, Now, on the command line , type “sunshine”

Point a web browser to https://localhost:47990/, ignore the problem with self signed certificates, and set your username and password

Now, your debian computer is running a sunshine server, go to any other machine where you want to install the client (moonlight) from here , and connect to your server by its IP address.

You are done !

Sunshine on Windows

Download sunshine on windows from the latest release (As of today, you will fine it here)

Install it like you would any other application, once done, the official help page will show up (this)

once you click finish, a page at https://localhost:47990/welcome will open, asking you to create a password, create one, the default username is sunshine, but you can use whatever you want (In my case, it is my default RDP password)

you are done, you can now access the windows PC from any device with moonlight

Moonlight on Windows

you can download moonlight ether from github (Here) or from the official website (https://moonlight-stream.org/),

USB over IP (network)

Hyper-v does not provide USB passthrough, some people use USB redirection from remote desktop RDP… A similar technology might be USB over network, but this does not always work, as many USB devices have very little tolerance for lag ! and this will introduce some lag !

My objective is to connect a MINI-VCI connected on a raspberry PI to a computer running other software to analyze the data, whether this works or not is yet to be seen.

There seems to be a few solutions online, some using generic hardware, and some using specialty hardware

The most diverse of those solutions that can work on everything from a raspberry pi to a windows computer and android phone is (https://www.virtualhere.com/), but I have not yet verified whether this software is USB/IP compatible or not

USB/IP has been built into the linux kernel for some time now, and a couple of solutions for both server and client are available on github, So here I will be investigating what I can do to bridge the Linux Raspberry PI to my windows PC,

USBIP is a protocol where the server is the machine connected to the USB device via wire, and the client is the machine that needs to use the USB device but is not connected to it via USB.

In linux, usbipd is the name of the server, and usbip being the client, In debian, both server and client are included in the usbip package, hence, on the raspberry PI and on the Linux server, we need to run the command

apt-get install usbip

The modules of USB/IP (usbip-core, usb-host, and vhci-hcd) are already included,

We will get to the Windows client after the Linux to Linux section

The two options

In the cases we are exploring here, the server is a Raspberry Pi (3), the client is a Windows machine, but there are a couple of things to try first, the Windows clients are KVM virtual machines, we will try

1- The client is the Linux Host machine hosting the windows virtual machines, and the USB port is passed to the virtual machine

OR

2- The Windows client has the USBIP driver directly connecting to the Raspberry PI server

The Steps

Installing the USB/IP server on the raspberry pi “apt-get install usbip”

How to pick a domain name registrar

Factors to consider

First of all, the choice depends on 3 things, or 4 but to me, the fourth is not very important

  • PRICE for a given TLD (TLD = .com, .net, etc…) and it’s persistence
    This is probably the most important factor, there is no such thing as “Performance” as your registrar does not run the TLD’s registry, something to take into account is also the renewal price next year.
  • whether or not you plan to use their “Usually free” nameservers (Most people will use their web host’s nameservers and not the registrar’s)
  • The business stability of the registrar, when a registrar goes down, you might find your domains with a registrar who picked up all the domains the sunken registrar had, and if you were using the old registrar’s add on services, you will end up needing to redo them, and probably find a different registrar that you like to move those domains to.
  • And last but not least, the interface and speed of the registrar’s website and tools, I don’t think this is very important as most registrars have a usable interface and you will only need to use it infrequently

Which one do i recommend ?

I personally use more than one registrar, for some TLDs, I use nameCheap, and for the more standard domain TLDs (Like .COM etc…) I used godaddy for a long time, then i switched to a godaddy reseller (PoloDomains), it has the same exact products (and phone support) as godaddy and in my experience this reseller has very persistent prices that are lower than those of godaddy themselves, not to mention that godaddy keeps surprising me with different pricing when the time comes to renew. Again, godaddy is a good registrar that checks all the boxes, but the reseller is more or less just cheaper. other good well known registrars include namesilo.com, google domains (Not recommended as google is selling it to another company), Name.com, domain.com and many others that you can research online…

Get it for free when it makes sense

Some web hosts offer free domain names for as long as you are paying for your hosting, this is not exactly a catch, but it might be, so what I do is decide on a web host through reviews and what have you, and if that web host offers free or cheap domains with their web hosting, then that is where I will get my domain, But mind you, when i make the choice, i subtract 1/12 of the normal domain price (that you would get if you used a separate registrar) from the monthly hosting fee, and then compare the web-hosts with the new discounted price tag, the last thing i want is to get stuck with a bad web host because they offer a free domain, that would be a very bad decision.

When is the registrar relevant to performance ?

The main function of a registrar is to sell you domains and register them with a registry, after registering them, the registrar also informs the registry of what nameservers to use with the domain name. after that, the registrar in it’s strict form has no technical function, up until you either want to renew that domain, or change the nameservers attached to that domain, a web request (from a website visitor for example) does not pass through your registrar.

The above remains true, unless you opt to use one of those free DNS services that are provided by many registrars, in this scenario you are using the registrar’s DNS servers instead of your host’s or a third party, which is not a bad idea depending on the quality of your registrar, godaddy (and it’s resellers) provides a free DNS service that uses anycast ! anycast is a cool internet technology where the user will be using the closest DNS server to them without knowing, effectively cutting down the latency of the DNS request.

Changing the default port 80 on nginx

First of all, check what ports nginx is currently listening on, you can do that with any of the following commands

netstat -tlpn| grep nginx
ss -tlpn| grep nginx

So, you probably found nginx listening to port 443 for SSL connections, and on port 80 for plain http….

On many occasions, you may want other application (Such as varnish or apache) to be listening on port 80, So nginx needs to move to another port, in this example, I am moving it to port 8080

Step 1: Go to sites available, there is the default site, and there are any other sites you added to nginX, open those config files that you will find in /etc/nginx/sites-available, search for 80, and replace it wherever it may occure with 8080 or any port of your choice, restrictions are the following, port numbers under 1024 will requier root privilages (So keep it above 1024), and the maximum port number is 65535, Also port 0 can not be used for http (Relevant to UDP though)

Tunneling Firefox traffic through SSH – Putty

I will here assume you already have a remote Linux machine that you can SSH into with putty, the instructions are simple from this point on

Putty Setup

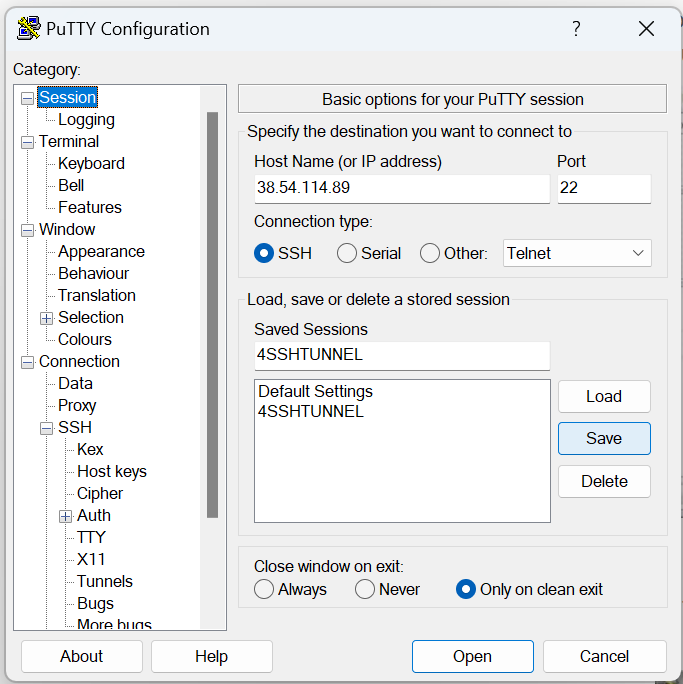
1- Basic putty settings, assuming you have already downloaded putty from chiark.greenend.org.uk, now open putty, enter the IP of the server you wish to tunnel through, and save it with a name, the steps are…
– Open putty,
– enter the IP of your remote machine
– give it a name of your choice
– save (You don’t need to save now, you will save again in a bit, but you can do it anyway)

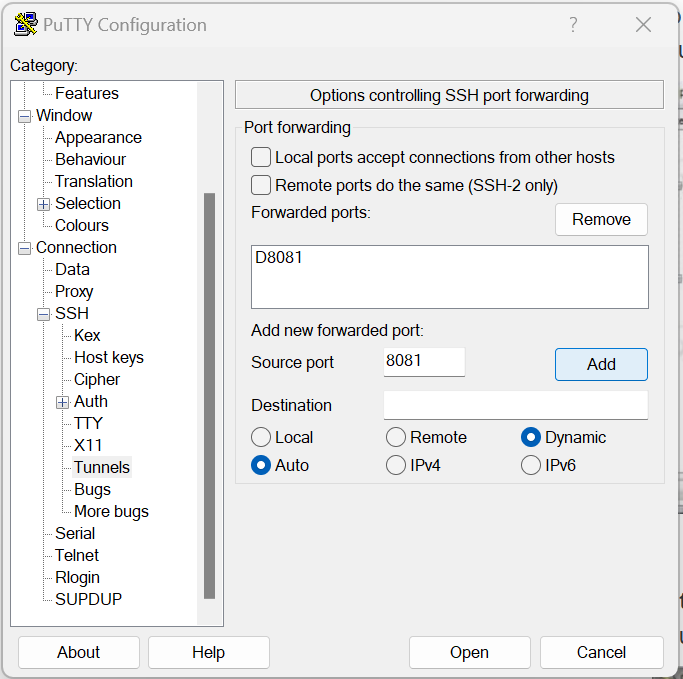
2- Go to Connection and expand it, then expand SSH, then select Tunnels, this will show a dialogue such as the below, fill in the data as follows

  • A Source port between 1025-65536 (of your choice), i chose 8081 but you can chose any other in that range
  • Check Dynamic and Auto, the click Add

3- From the menu on the left, go back to Session, and click the save button again (So that the new tunnel settings are saved for next time)

4- You are almost done, Now double click the saved session name or select it and hit open, the remote machine should now prompt you to enter a username and a password, once you enter those, you have a tunnel ready on your localhost (127.0.0.1) on port 8081, next we will setup Firefox to use that tunnel

Firefox setup

1- Go to firefox settings (Click the accordion menu to the right, and chose settings), once open, scroll down under general, until you find the Network Settings section, click the settings button in that section

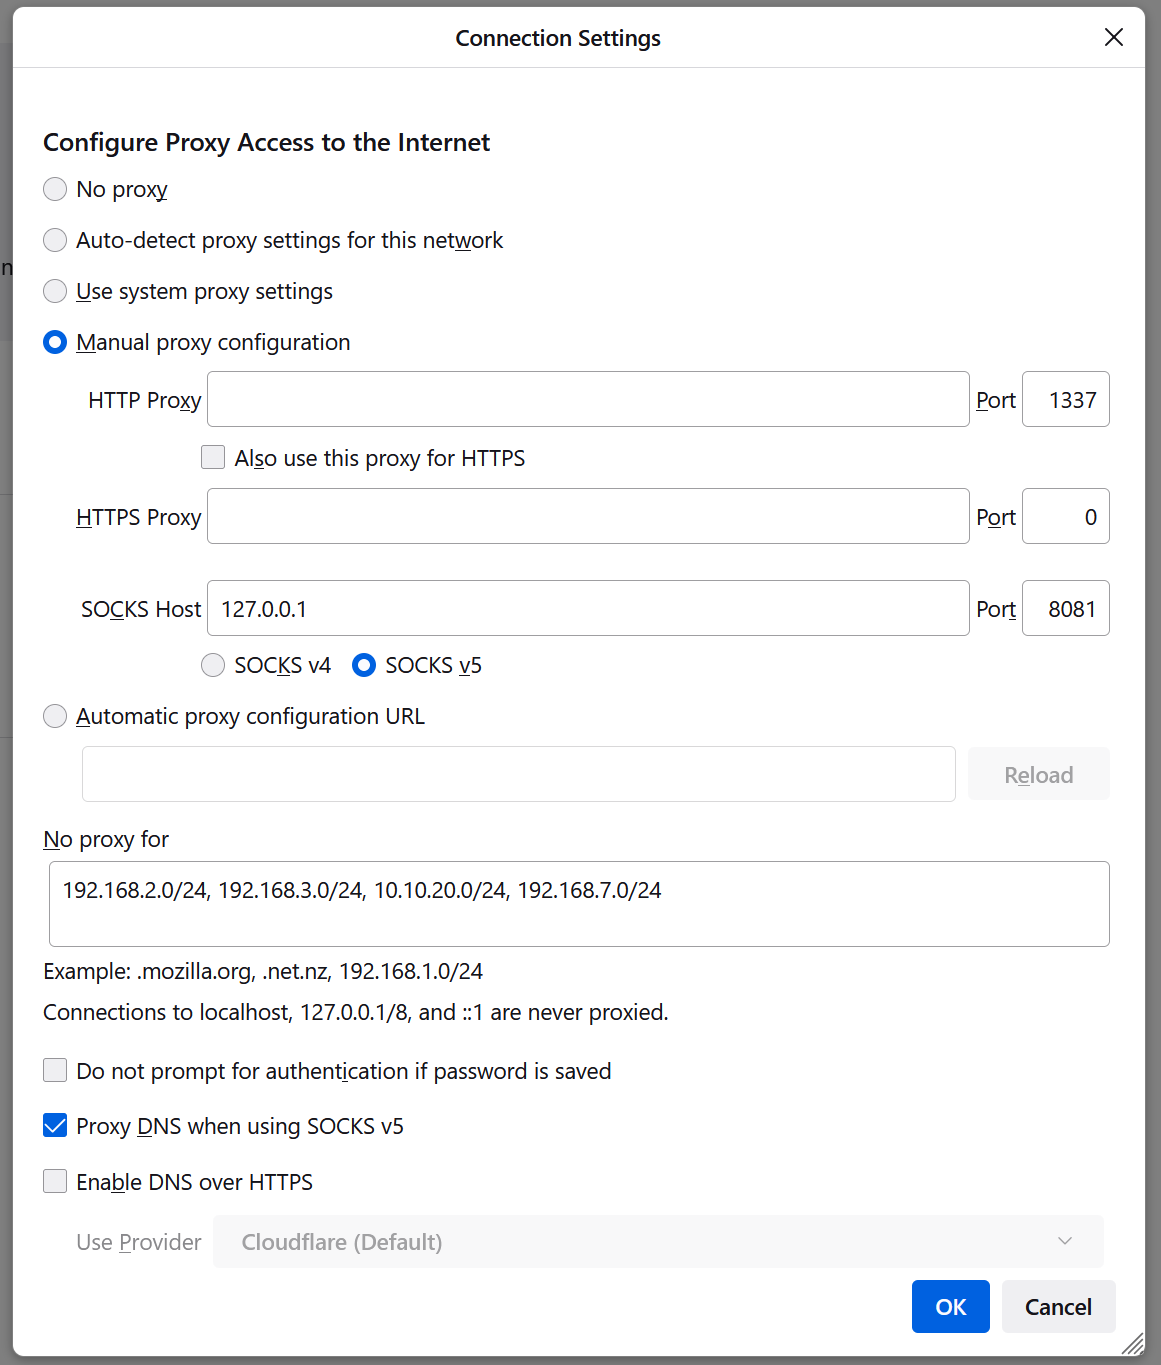
Clicking settings above will show the following popup dialogue, setup your system as follows

  • Manual Proxy Configuration
  • SOCKS Host enter 127.0.0.1 and in the port area of that the port we chose in putty (In my case, 8081)
  • Optional – Add the IP address ranges of the IPs that you do not want to have tunneled through the remote machine
  • For more privacy, and sometimes functionality (When access is blocked from abroad), make sure you tunnel your DNS queries as well (See checkbox below)

Now, to verify that you are conencted to the remote machine, google the following

what is my ip

and google should tell you what your IP address is, at this stage, it should be the same as the remote machine’s IP (Not yours)

Linux

To do this in Linux, it is much easier, simply start the session with the remote machine with the following line

ssh -D 8081 qworqs@your_hostname_or_ip

Free SSL certificates with Let’s encrypt, step by step

Let’s encrypt is a Certificate Authority (CA) run by Internet Security Research Group (ISRG), and is sponsored by some of the biggest name in the web industry

You are probably here to create a certificate, not get a history lesson ! so Let me cut the chase, for those who want to know more, there is always wikipedia (Let’s encrypt on Wikipedia)

So let’s encrypt provides certificates for domain names, including wildcard certificates (Which I will get to by the end of this article), What we are going through here is the manual process, which serves to give you a taste of how things work, in practice, you are encouraged to use on of the automated methods for multiple reasons, one compelling such reason is that Let’s encrypt issues certificates valid for three months only ! You don’t want to have to cater to your certificate every three months do you ?

To simplify things, I will create a step by step video to demonstrate the creation process ! and post it here, but for now, I will simply take you through the steps, in this tutorial, all you need is SSH access to any server including one you have at home ! or even maybe a virtual machine running Linux inside your windows computer, anything goes, once you have a certificate, you can move it to your production server, this allows me to keep this as general as possible, and this is done using the –manual option, So without further ado, let me get to it

1- login to a linux server and install certbot, the tool that allows you to get certificates from let’s encrypt, On the official website, they promote the use of SNAP, here, I will skip snap and use Debian’s repository ! simpler and there is no need to get into snap

apt install certbot

Now that you have certbot, let us create a certificate for the domain example.com (replace it with your own)

certbot certonly --manual --preferred-challenges http

The –preferred-challenges directive allows you to specify what challenge (http or dns) you would like to perform, the manual plugin is basically the same as webroot plugin but not automated, which is a hassle to keep up to date as this form of issuance needs to be renewed manually every 3 months, (You can take extra steps to automate this) which i will describe later on another post to keep things tidy

Now, as soon as you enter the above, you will enter an interactive dialogue with the following steps

Note: If you want to create a wildcard certificate for your domain name, let’s encrypt allows the use of the * wildcard, but only supports DNS challenge, so the command must reflect that, So when asked for a domain, simply enter *.example.com (or -d ‘*.example.com’), should work normally

As soon as you are in, you will be asked

1- An email for notifications
2- Do you agree to the terms of service ?
3- Would you like to subscribe to the newsletter ?
4- enter your domain names (you should enter both example.com and www.example.com separated by either a comma or a space)
5-

Create a file containing just this data:

Pg1xJ.........-88

And make it available on your web server at this URL:

http://example.com/.well-known/acme-challenge/Pg1...........xuu_0

6- Now you need to create the 2 challenge files, one for exmaple.com and the other for WWW.example.com

Create a file containing just this data:

Ud4m81x..............zupbWEz-88

And make it available on your web server at this URL:

http://www.example.com/.well-known/acme-challenge/Ud4........550

(This must be set up in addition to the previous challenges; do not remove,
replace, or undo the previous challenge tasks yet.)

--------------------------


IMPORTANT NOTES:
 - Congratulations! Your certificate and chain have been saved at:
   /etc/letsencrypt/live/example.com/fullchain.pem
   Your key file has been saved at:
   /etc/letsencrypt/live/example.com/privkey.pem
   Your certificate will expire on 2023-03-11. To obtain a new or
   tweaked version of this certificate in the future, simply run
   certbot again. To non-interactively renew *all* of your
   certificates, run "certbot renew"
 - If you like Certbot, please consider supporting our work by:

   Donating to ISRG / Let's Encrypt:   https://letsencrypt.org/donate
   Donating to EFF:                    https://eff.org/donate-le

At this stage, there are things you should remain aware of

1- DO NOT RENAME OR MOVE THE CERTIFICATES, they need to be in place for renewal if you decide to not automate and check on your certificates every 3 months.

2- Copy (Don’t move) them to the ssl directory, and add them to your config files, the only files you will need to include in your nginx or apache2 config are as follows

For apache 2, you need to use the following 2 lines, modify the path to the files to wherever you have placed them

      SSLCertificateFile /etc/apache2/ssl/example.com/fullchain.pem
      SSLCertificateKeyFile /etc/apache2/ssl/example.com/privkey.key

And for nginx

        ssl_certificate /etc/nginx/ssl/allspots.com/fullchain.pem;
        ssl_certificate_key /etc/nginx/ssl/allspots.com/privkey.pem;

So, restart apache or nginx, and you should be able to see the certificate in action, so this is the simplest way to use let’s encrypt, in my next post, I will

Now, after 3 months, the simplest way to renew the certificate is to issue the command

certbot certonly --force-renew -d example.com www.example.com

Self signed wildcard security certificate for apache or nginx

This tutorial is done on a debian 11 system… it should work for wildcard (For all subdomains under a domain), but also for subdomains or the primary domain, obviously, all you need to do is replace the * which denotes wildcard with the subdomain of your choice, so *.qworqs.com is wildcard, yazeed.qworqs.com is a subdomain 😉 so let us get started

Let’s encrypt has certainly revolutionized the world of SSL certificates (By making them free), but when it comes to wildcard certificates, let’s encrypt will require more than just generating the certificate, it will require a system that automatically alters DNS at your registrar, and differs from registrar to registrar.

So while I am developing, and need a wildcard SSL, I can simply generate a self signed wildcard security certificate, and teach my browser to accept it, and that is that, so here is how to generate that certificate !

So let us get started, first let us create a public and private key in one go, and a folder to store them !

cd /etc/ssl
sudo mkdir qworqs.com
sudo openssl req -x509 -nodes -days 365 -newkey rsa:2048 -keyout /etc/ssl/qworqs.com/wildcard-ss.key -out /etc/ssl/qworqs.com/wildcard-ss.crt

I will personally skip selecting a strong Diffie-Hellman group… this file though goes somewhere else in the nginx directory, and can be generated like the following, but again, I don’t need it atm.

sudo openssl dhparam -out /etc/nginx/dhparam.pem 4096

Now you are done with creating everything you need, the next step is to install them into your nginx configuration

So all you need is to add the following 2 lines into your server section within the website config file 😉

    ssl_certificate /etc/ssl/qworqs.com/wildcard-ss.crt;
    ssl_certificate_key /etc/ssl/qworqs.com/wildcard-ss.key;

Now all you need is to restart nginx, and you should get a warning in your browser, I accept the warning, then make it permanent in firefox from the settings

Settings -> Privacy & Security -> Security -> Certificates -> View Certificates... -> Servers Then switch it from temporary to permanent

And that’s that