From other posts like this one, I seem to always be complaining about the 209 E200 W211, The thing i never mentioned is that I have an even older Mercedes E200, A W124 that has been parked for 8 years and decided just now to revive it.
for one, there is a water leak in the cooling system, for another, it has no gas in it, and the fuel pump is not working !
I recall from 8 years ago someone telling me “I can smell gas” While the car was parked near us ! So i am guessing, there is a small leak that is leaking out the gas
Not long before it got parked (8 years ago), the car had a serious leak (Leaked a full tank in a day) and I had to change the hose that connected the fuel tank to the fuel pump that is under the car !
Here are the specs, and this is post is all about how I plan to bring this car to life in a few days !
My Mercedes 200 E (W124 – E200)
- Transmission: 5 Speed manual transmission
- Engine: M111.940 (Wikipedia) (Check if part is 111 010 8700 on xentry/das)
- It has that different looking steering wheel and shifter, If i recall right, this variant’s name has the word sport in it (probably sports line), but I am not sure what it was called exactly, I recall this info because I had to get the steering wheel shipped from Poland as no used or new parts dealer has ever seen it before
Diagnostics/OBD2
Well, this 1994 E does have a diagnostics port, but it is nothing like OBD2 (It is OBD1 not 2), it is very easy to read, just connect any LED (use a 12V LED, or adapt an LED for 12V with resistors obviously).
The 16 pin connector can be accessed with banana plugs connecting the LED to the flowing
Pin-3 = ECU (BLINK… LED+Button)
Pin-6 = K-line (BLINK… LED+Button) (Ex: VAG-COM USB reader)
Pin-1 = GND
pin-16 = 12V
The users manual does not go into sufficient detail concerning the (HFM Sequential Multiport Fuel Injection/Ignition System (HFM-SFI))
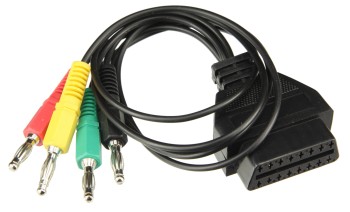
The OBD plug can be accessed with a scan tool (Ex: HfmScan) using the diagram below, if you insist on going into that rabbit hole, there are adapters (OBD2 to banana) like the one you see here, which connects the OBD connector to the following pins (OBD breakout cable 4 colours)
Now, I prefer using the LED method
Degrading wires (Mercedes and Porsche !)
Why I think claiming that the degrading wires were “intentionally installed for easier recycling” is a bullshit attempt to cover Mercedes benz’s unforgivable failure on those models
- Having an arcing wire right next to the fuel pump is an even worse failure than the failing to predict that the wires will bio degrade
- Giving a rust insurance of 30 years, and having the wires degrade after 10 ? doesn’t make any sense, You are implicitly telling the consumer you are expecting the car to live for 30 years, having its cables degrade starting after 10 years with the most dangerous ones, and eventually degrading to the extent that fixing it is not feasible contradicts the assumption of expected longevity !
- Assuming the above is not correct in the sense that not all wires degrade, only those exposed to heat etc… defeats the purpose they claim the wires were scheduled to degrade for
To revisit
When your primary concern is getting it to run, you will come across stuff that needs attention after, here is a small list
- The wires to the fuel pump need shrink wraps
- Distilled water to be swapped with antifreeze
Shopping list
I don’t think this will be a long list, but I am mentioning what I needed here so that if you are in a similar situation, this might remind you of what you might need
- Both kinds of polish compounds
- Retouch paint, and application thingie
- Thinner (To clean spray gun after)
- Clear coat
- Clean, lint free cotton
- Masking paper
- Electrician’s tape
- Gasoline ! since it probably evaporated
- A 12V tester (Usually in the form of a screw driver with a wire hanging out from the back to go to ground/Negative)
- A 12V car battery (The one in the car is 100% toast)
- Distilled water for the radiator (Add antifreeze later)
Head gasket and valve stem seals !
Surprise ! the head gasket is toast (happened while it was sitting) ! So I will probably need to start with this one
The head gasket i found on the market are Reinz (Victor Reinz now owned by DANA)… Part number 61-29105-10 – I am told that for that model year, the gasket was either Reinz, or Elring, Mercedes used both as OEM so I am hoping i should be good… the head gaskets for the M111 was a multi-layer steel (MLS), and is 91 mm diameter, 1.75 mm thickness, which is what the gasket i have is !
On ebay, it says this gasket fits the OEM numbers (111 016 05 20, 111 016 06 20, 111 016 11 20, 111 016 26 20, and 111 016 27 20)
For the Exhaust Manifold Gasket, I found the Victor Reinz Exhaust Manifold Gasket 71-29349-00, which seems to fit the bill (matches Mercedes-Benz OEM numbers 111 142 05 80 and 111 142 08 80)
Torque spec for the M111 exhaust manifold nuts is 25 Nm (Double check)
TTY head bolts: So, what is left is finding new TTY head bolts (torque-to-yield), this is usually where my problems begin, I am always forced to use the old bolts (Like everyone else) because finding those bolts is next to impossible in Jordan ! they tell me (We don’t cary them because no one orders them), this happened to me lately with my Toyota and almarkazeyah exclusive Toyota dealer !
Valve stem seals: Found the Corteco brand (PN: 19034069) ! this is not ideal as I prefer having OEM like Reinz or Elring, But I am being told Cortico is a brand of Freudenberg, the inventors of the seals you see on the crank of your car for example (Their brand of it was called Simmerring), So, with this old engine, I guess i will give them a go ! the box I have reads (made in Italy), Italy is the place where Chinese products go to get a European seal of origin (A loophole in the system, probably intentional) states that if anything is added to the product in italy, it can be branded as made in Italy !